


If you’ve ever dreamed of seeing the magical dance of the Northern or Southern Lights, you’re definitely not alone! Auroras are one of nature’s most stunning spectacles, and capturing them with your camera is an experience you won’t forget. But where can you see them? What causes them? And most importantly, how can you photograph auroras successfully?
In this article, I’ll answer all those questions, share some practical photo settings to help you capture your aurora adventure perfectly, and give you location tips for the South Island of New Zealand.
Article Content
What Are Auroras?
Auroras have been called many names—Northern Lights, Southern Lights, Polar Lights—but no matter what you call them, they are a stunning light show in the night sky. You usually have to be close to the North or South Pole to see them, and even then, you need just the right conditions. When everything lines up perfectly, you can see shimmering green, red, and purple lights dancing across the sky, even with the naked eye.
I still remember the first time I saw the aurora in New Zealand. We had planned everything, checked the forecasts, and drove about 1.5 hours from Christchurch to find the perfect spot. It was an incredible experience! But sometimes, the best moments happen spontaneously—like the second time I saw the aurora, completely unplanned, while camping on the West Coast. I just happened to glance up while grabbing something from our tent, and there it was! Right time, right place, no clouds—pure magic.
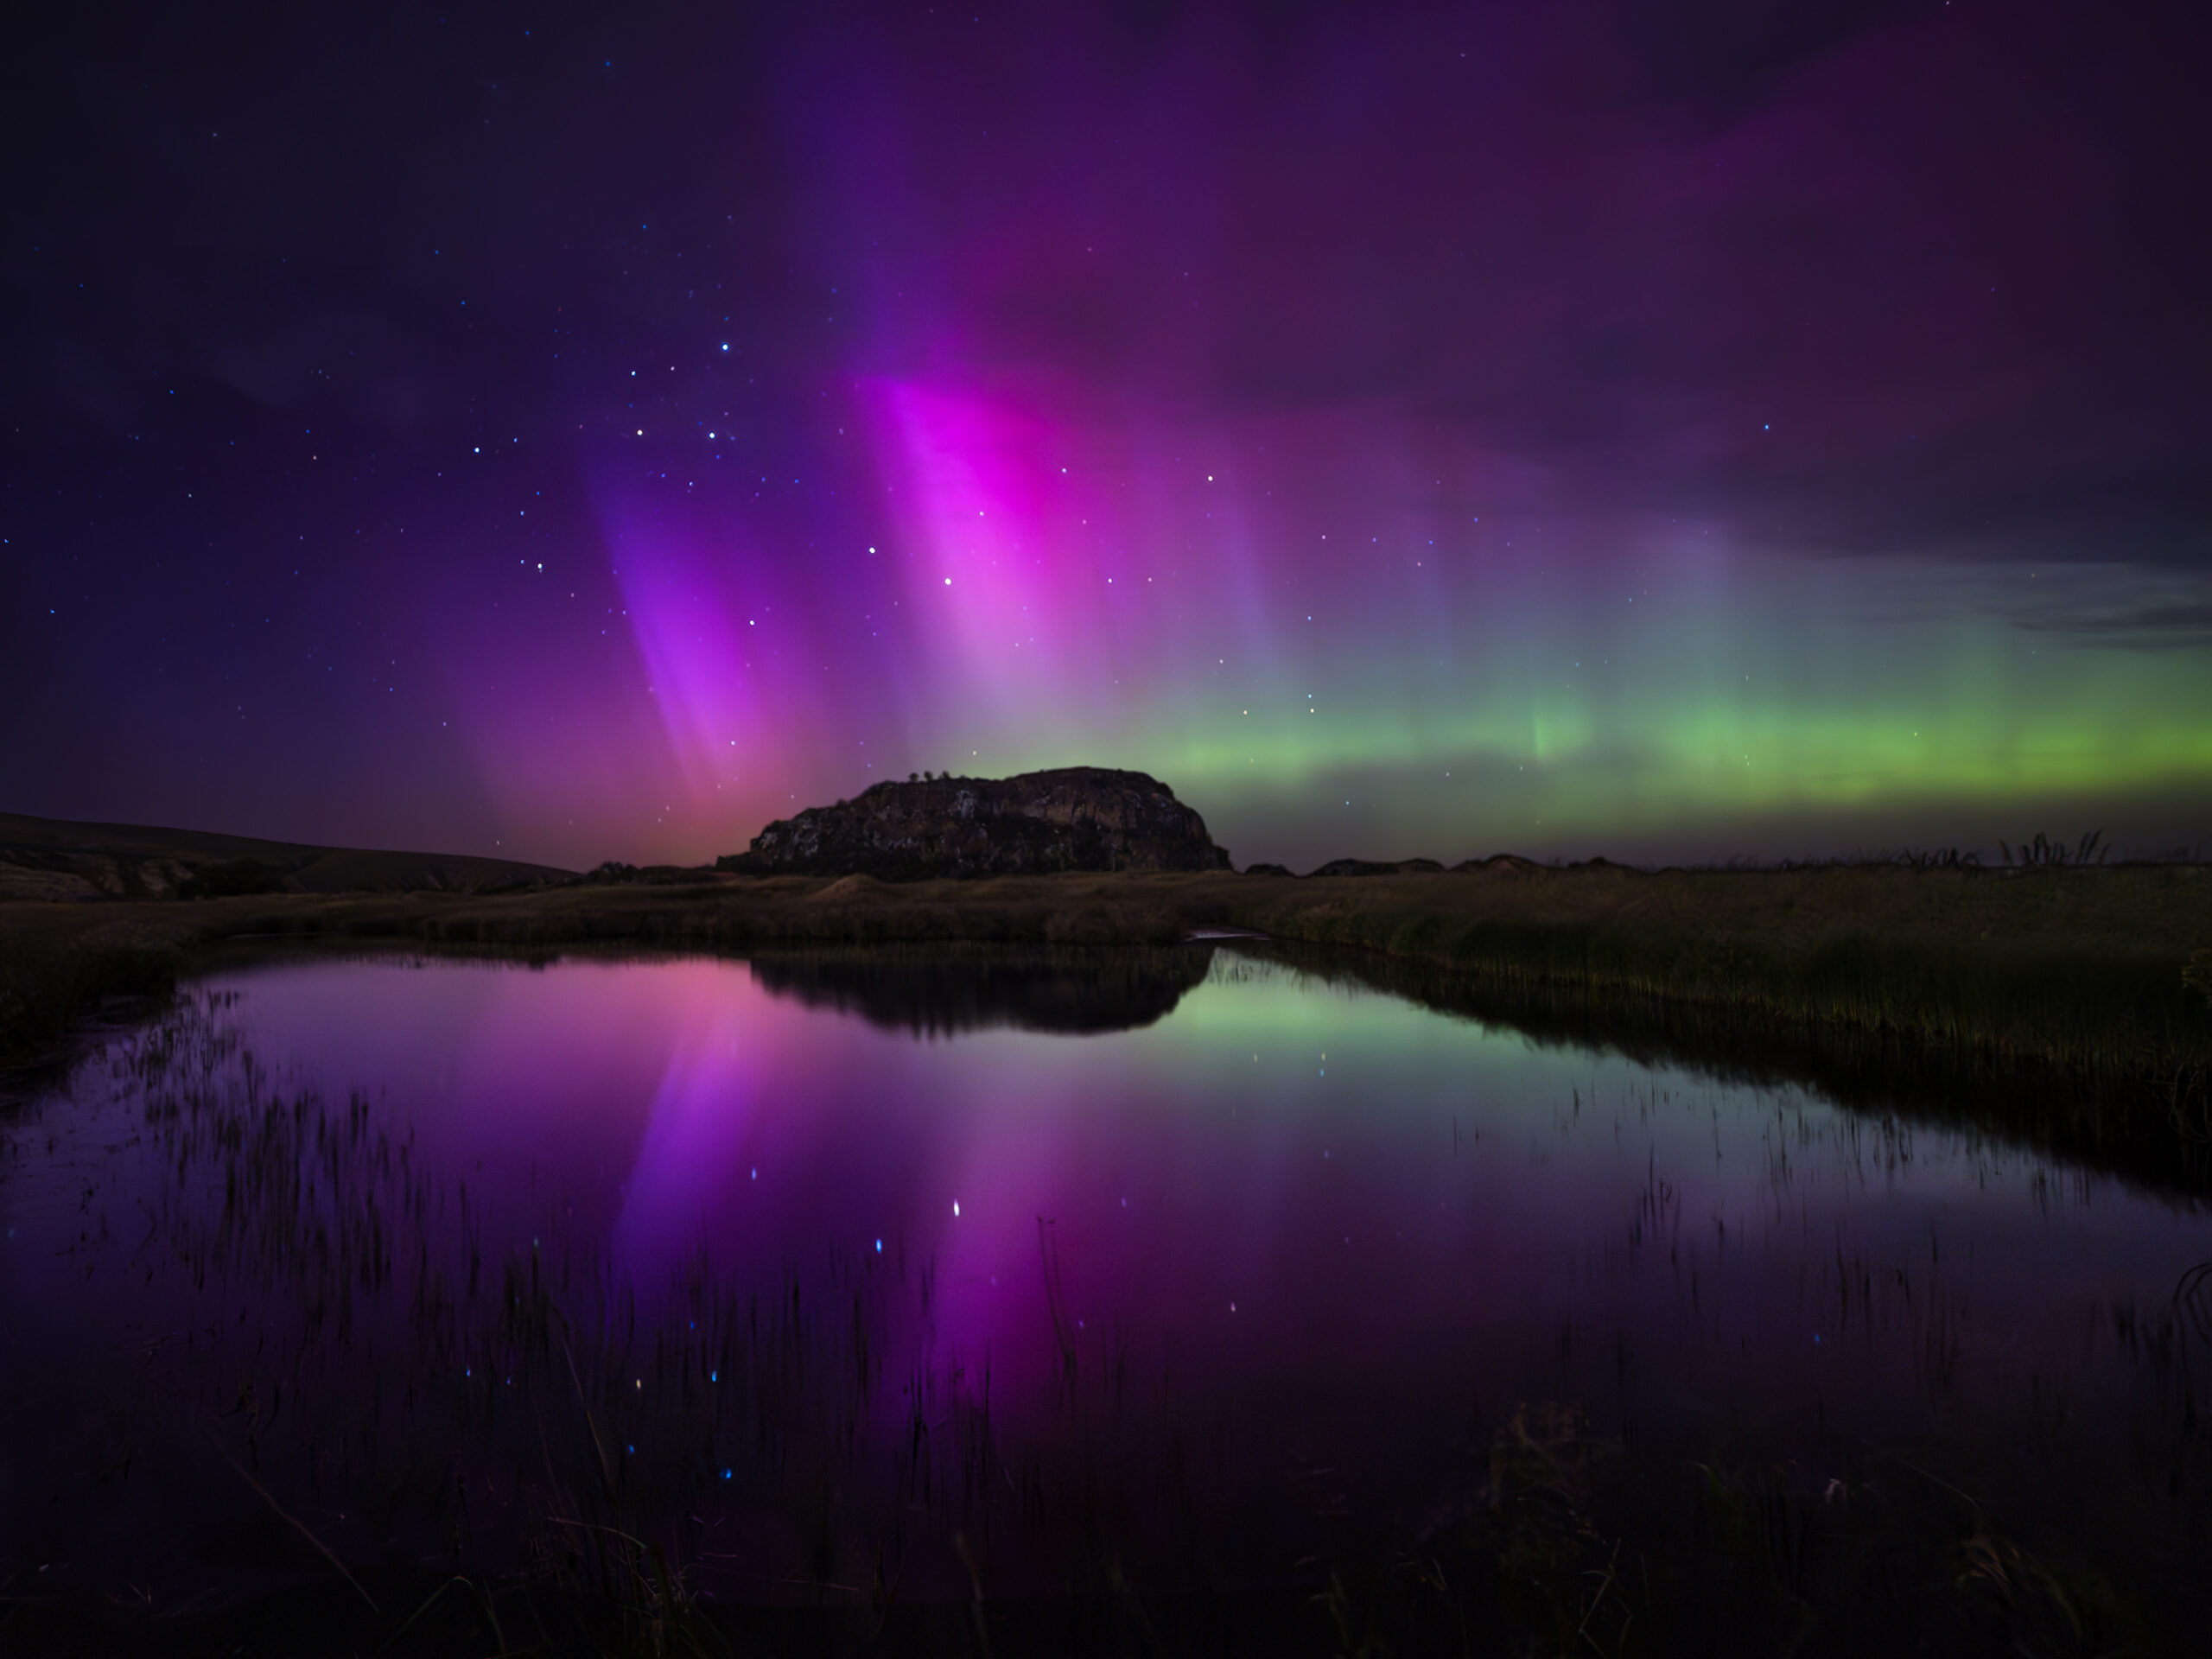
My first Aurora Australis was at Banks Peninsula, Canterbury, New Zealand. I wasn’t quite sure about the settings, but we found an amazing location that I later visited again for another aurora photography adventure.
What Causes Auroras?
I always want to understand things and have answers to all my “why” questions. It was the same with auroras—after seeing one, I wanted to know what causes them, why they have different colors, and basically what they are. A little bit of theory before photographing.
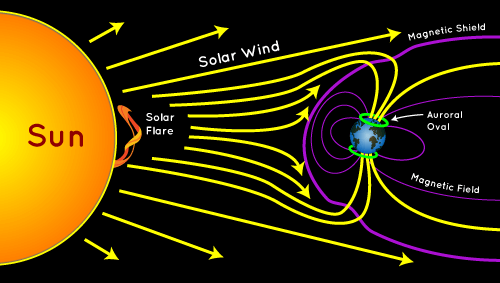
The story of the aurora begins with the Sun. Occasionally, the Sun releases powerful eruptions called Coronal Mass Ejections (CMEs), which send charged particles speeding through space. When these particles reach Earth, they interact with our planet’s magnetic field and are pulled toward the poles. As they collide with oxygen and nitrogen atoms in the atmosphere, they release energy in the form of light—and that’s what creates the aurora!
NASA’s explanation of the Aurora story. Source: https://spaceplace.nasa.gov/aurora/en/
Aurora Colors Explained
The aurora isn’t just a beautiful light show—it’s a collision of energy and atmosphere, painting the sky in vibrant colors. As you may notice, the colors of auroras can vary depending on the altitude at which ions from solar winds collide with atoms. Different gases at different heights glow in their own unique way, creating the stunning greens, reds, and even purples that dance above us.
- Red – 240 km (150 miles) above Earth (oxygen atoms)
- Green – 160 km (100 miles) above Earth (oxygen atoms)
- Purple – 80 km (50 miles) above Earth (nitrogen atoms)
- Blue – Below 80 km (50 miles) above Earth (nitrogen atoms)
Green is the most common color you’ll see, but if you’re lucky, you might catch a glimpse of the rarer red or purple hues too!
Aurora Borealis vs. Aurora Australis: What’s the Difference?
I used to think the Northern and Southern Lights were completely different, but they’re actually like long-lost twins—similar but with a few key differences! Aurora Borealis (Northern Lights) happens in the Northern Hemisphere, while Aurora Australis (Southern Lights) occurs in the Southern Hemisphere.
They often appear at different times, and depending on your location, you might see them at different angles. For example, in New Zealand (about 50° south), I capture auroras from the side, while in Iceland (66° north), you’d see them almost directly overhead.
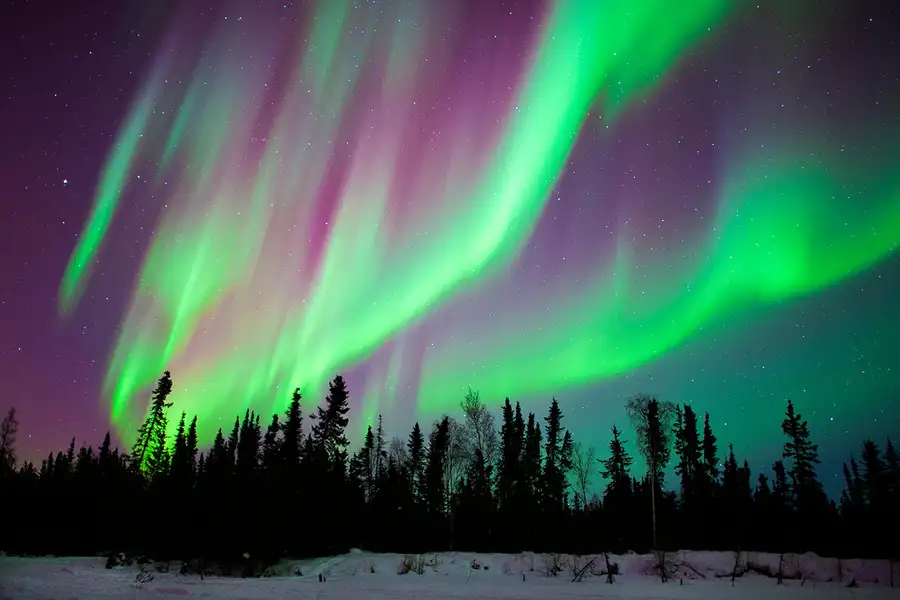
I wasn’t lucky enough to see the Aurora in the Northern Hemisphere, so I borrowed this example of the Aurora Borealis. Source: https://www.newscientist.com/article/mg24432590-500-see-the-northern-lights-or-aurora-borealis-follow-this-easy-guide/
Where to See the Aurora?
Want to chase the aurora? Here are the best locations:
- Northern Hemisphere: Norway, Sweden, Finland, Iceland, Canada, Alaska, and Greenland
- Southern Hemisphere: New Zealand, Tasmania, Patagonia, and Antarctica
Where to capture the Aurora Australis in New Zealand
In New Zealand, the opposite rule applies compared to the north—you want to be as far south as possible, ideally on the South Island. A clear, unobstructed view to the south is key. Look for a spot with minimal light pollution and some elevation.
Here are a few great spots on the South Island for viewing the Aurora Australis if you’re nearby and the forecast looks promising:
- Christchurch – Port Hills, around Lake Ellesmere, and the southern parts of Banks Peninsula
- Lake Tekapo – Around Lake Tekapo and from Mt. John
- Twizel – Lake Ruataniwha
- Mt. Cook National Park – Sefton Bivvy or other higher-elevation spots facing Lake Pukaki
- Queenstown – Queenstown waterfront, Lake Moke, Coronet Peak
- Te Anau – Along the lake edge and at Lake Gunn
- West Coast – Coastal locations like Smoothwater Bay and Punakaiki
A surprise Aurora Australis at Smoothwater Bay on the West Coast of New Zealand. Captured in one shot.
When to See the Aurora?
Aurora season typically runs from mid-March to mid-September, peaking around spring and autumn. However, solar activity doesn’t follow strict rules, and there’s always a chance to see auroras year-round—so sometimes, you might even catch them in June or July if conditions are just right!
Key Factors for Seeing the Aurora
If you’re hoping to catch the aurora, there are a few key factors to keep in mind. Here’s what can make or break your chances:
✅ Solar storm strength
✅ Moon phase (less moonlight = better visibility)
✅ Cloud cover (clear or mostly clear skies are a must!)
✅ Your location’s latitude
✅ A clear view to the North or South—no big mountains in the way!
How to Know If You'll See Auroras Tonight?
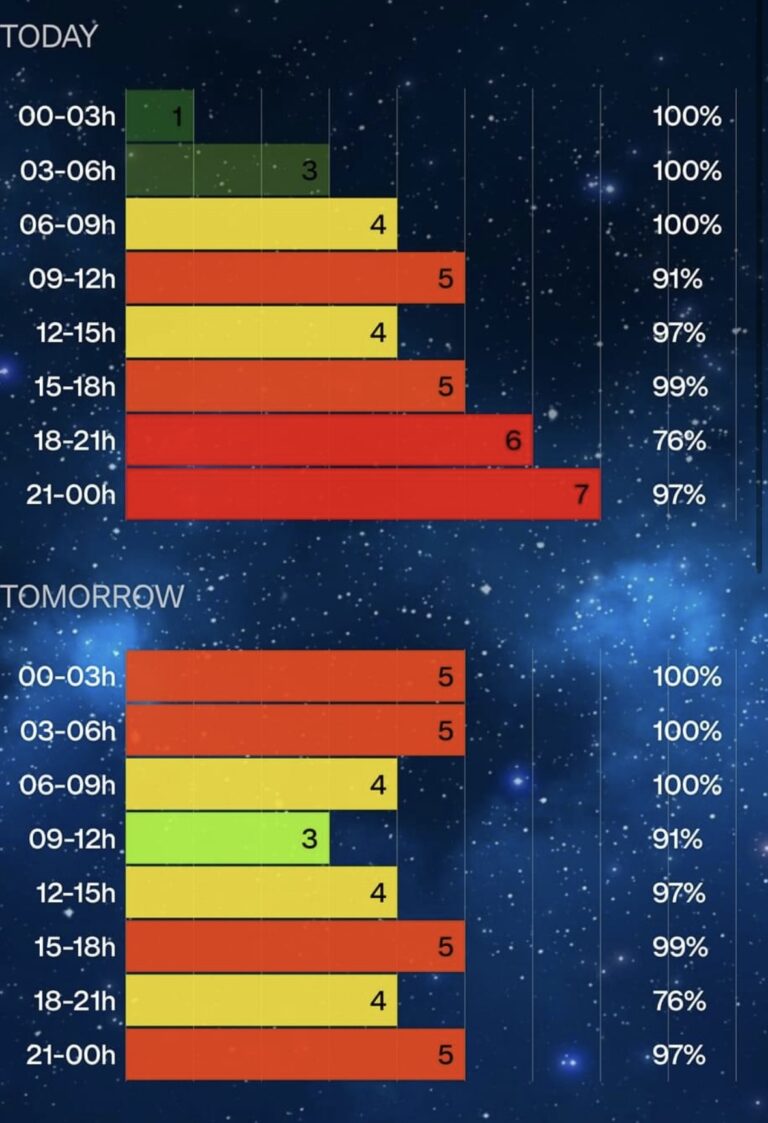
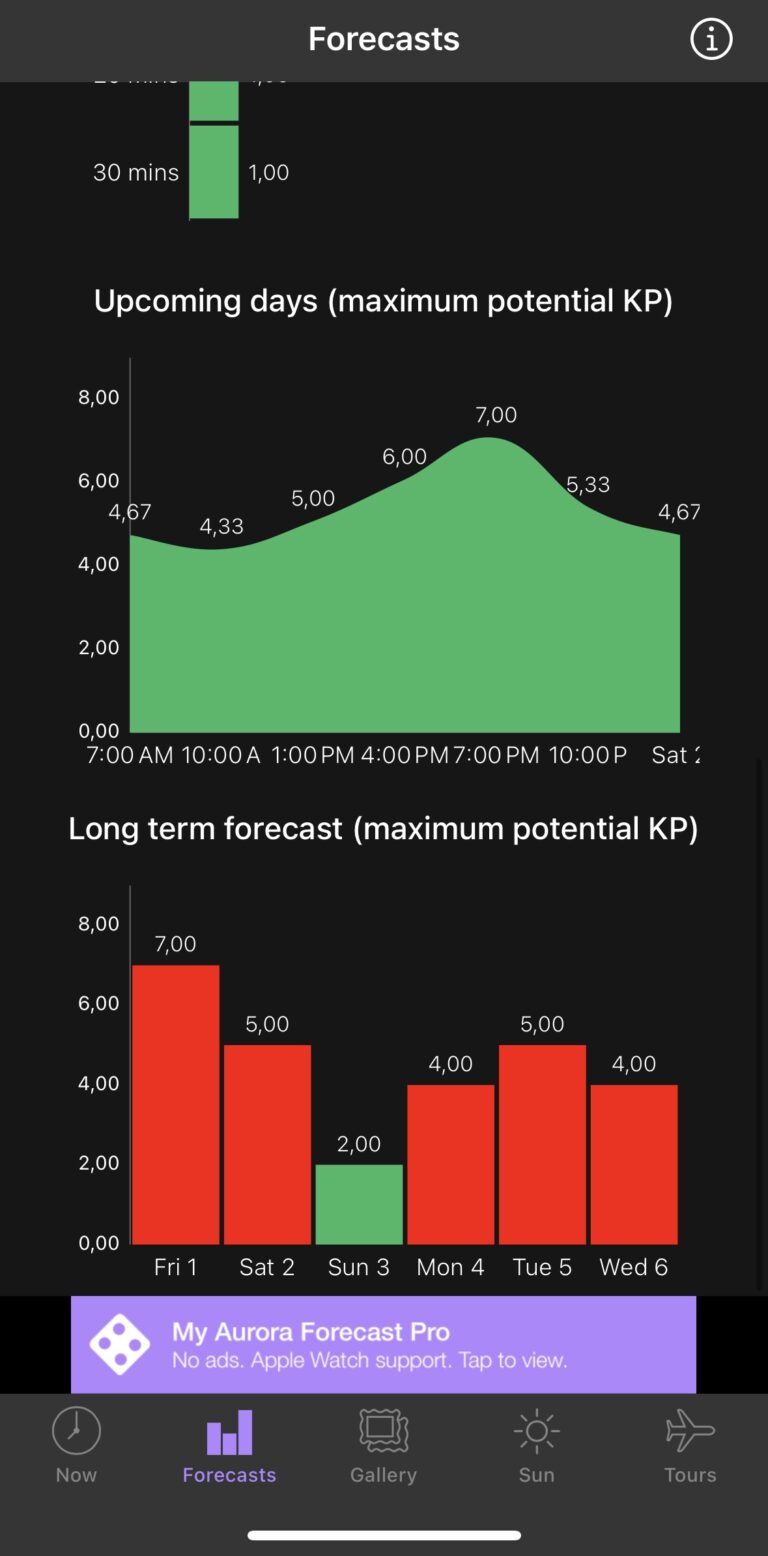
There are tons of forecasting apps, Facebook groups, and websites for tracking auroras, but the two key things to watch are the KP index and Bz number—you need both to line up for a good show! I use the MyAurora Forecast & Alerts app, where I set up notifications for my location when the KP index is high. This helps me stay prepared if something might happen.
➜ KP index measures geomagnetic activity. If you’re close to the pole, a lower KP (around 4) might be enough to see the aurora. But if you’re farther south, like in New Zealand, you’ll usually need a higher KP, somewhere between 5 and 7.
➜ Bz number needs to be negative—once it drops below zero, the energy can enter the atmosphere, and that’s when you have a chance to see the aurora with the naked eye.
My tip: I follow an aurora hunter Facebook group in New Zealand where people share forecasts and real-time sightings. If you’re into aurora chasing, I highly recommend finding a similar group in your area and joining—it’s a great way to stay updated and get inspired!
Aurora forecast for New Zealand showed a high KP index and a low Bz number on December 1st and 2nd, 2023. That night, the aurora was visible to the naked eye.
How to Photograph the Aurora?
Photographing auroras is a lot like shooting the night sky—it’s all about setting up your camera right, using manual mode, and patiently waiting for the magic to happen!
What You Need to Capture the Aurora
Photographing auroras is similar to night photography—you’ll need some essential equipment to achieve your goals. You don’t need the most expensive gear, but it’s important to focus on the key features that will make a difference. Shoot in RAW for the best flexibility in post-processing.
➜ Photography location – It’s a good idea to scout your location during the day and set up your tripod facing North or South, so you’re ready when the lights appear. Also, think about your composition ahead of time.
➜ Tripod – sturdy, with no movement when locked, which will keep everything sharp.
➜ Lens – with the lowest f-number, ideally f/1.2 to f/2.8. (Lower f-number lenses are usually more expensive) You’ll also need a wider lens or a fisheye.
➜ Remote shutter or delayed shutter on the camera – this will reduce the risk of shaky images after pressing the shutter button with frozen fingers. You can also experiment with self-portrait photography.
➜ Headlamp – with a red light option. I always use the red light to avoid accidentally ruining other photographers’ shots.
➜ Warm clothes – down jacket, warm socks, gloves, and a warm hat.
➜ Coffee and snacks – the night can be long while waiting for the aurora. Once, I spent 8 hours outside waiting, and the best aurora light didn’t show up until around 4 a.m.
Basic Camera Settings (Manual Mode)
This camera setup is great for a quick capture—you’ll take just one shot of the aurora and the foreground. Unfortunately, this means more editing (post-processing) later, and sometimes, you risk losing details in the foreground.
- Aperture: f/2.8 or lower (wider aperture = more light)
- ISO: 400–6000 (adjust based on aurora brightness)
- Shutter Speed: 10–15 seconds (captures light beams without too much blur)
- White Balance: 3500–4000K (adjust in post-processing if needed)
- Focus: Manual, set to infinity (∞ symbol on your lens)
My tip: Focus on setting up Aperture and Shutter Speed first. Get those right, then adjust ISO after a few test shots. I usually start with ISO around 1500 and tweak it from there!
I used basic settings for this image—I took a single shot of the entire scene. You’re looking at Aurora Australis over Lake Ellesmere (Te Waihora), Canterbury, New Zealand.
Compare this image with the one below, which was captured using two shots—you can really see the difference! In this case, I lost a lot of details in the foreground due to the high ISO and wide aperture.
Advanced Setup for Foreground + Sky Blending
Want to capture both the aurora and the foreground details? Take two shots—one for the sky and one for the landscape—with these recommended settings:
- Aperture: f/2.8 or lower (wider aperture = more light)
- ISO: 400–6000 (adjust based on aurora brightness)
- Shutter Speed: 10–15 seconds (captures light beams without too much blur)
- White Balance: 3500–4000K (adjust in post-processing if needed)
- Focus: Manual, set to infinity (∞ symbol on your lens)
- Aperture: f/5.6–f/8 to capture foreground details
- ISO: Lower (100–500) to reduce noise
- Shutter Speed: 60 seconds to 4 minutes to let in enough light (depending on the light conditions, but longer is better for details)
- Focus: Set focus on something in the foreground, about 2/3 into the shot
Later, blend both images in Photoshop for a final shot where the aurora looks vibrant, and the landscape is crisp and well-lit. It takes a little extra effort, but the results are totally worth it!
I used advanced settings for this image—I took one shot of the aurora and a second shot with a long shutter speed to capture the details of the rock and grass in the foreground. After blending these two shots together, you’re looking at Aurora Australis over Lake Ellesmere (Te Waihora), Canterbury, New Zealand.
Compare this image with the one above, which was captured as a single shot—you can really see the difference!
Troubleshooting Aurora Photography
Even with the right gear and settings, aurora photography can be tricky. Changing conditions, extreme cold, and camera limitations can all make things challenging. If something isn’t working, here are some quick fixes:
➜ Photos too dark? Increase ISO. A higher ISO will make your image brighter, but be careful not to go too high, or you’ll get too much noise. Try adjusting in small steps until you find the right balance. By using Manual mode, you can control ISO, shutter speed, and aperture to get the best exposure.
➜ Aurora looks blurry? Shorten your shutter speed. If the aurora is moving fast, a long exposure can make it look smudged. Try reducing the shutter speed to capture more defined details in the lights.
➜ Can’t get sharp focus? Use manual focus and zoom in on a bright star or distant light to fine-tune. Autofocus often struggles in the dark, so switching to manual and adjusting carefully will give you better results.
My self-portrait with the Aurora Australis just starting to appear on the horizon directly to the south—nothing for thousands of kilometers, then Antarctica. Captured in a single shot. Banks Peninsula, South Island, New Zealand.
Final Thoughts on Aurora Photography
Aurora photography is a blend of science, patience, and a little bit of luck. But when you finally capture that perfect shot, it’s totally worth it! Whether you’re planning your first aurora chase or looking to improve your night photography skills, I hope this guide helps you feel confident and ready to capture the magic.
Ready to take your photography to the next level? Download my free e-book: 4 Key Tips to Break Away from Ordinary to Extraordinary Photography.
Stay prepared—when the aurora forecast notification pops up on your phone, you’ll be ready to grab your camera and make the most of the moment!
Good luck with hunting Aurora lights!

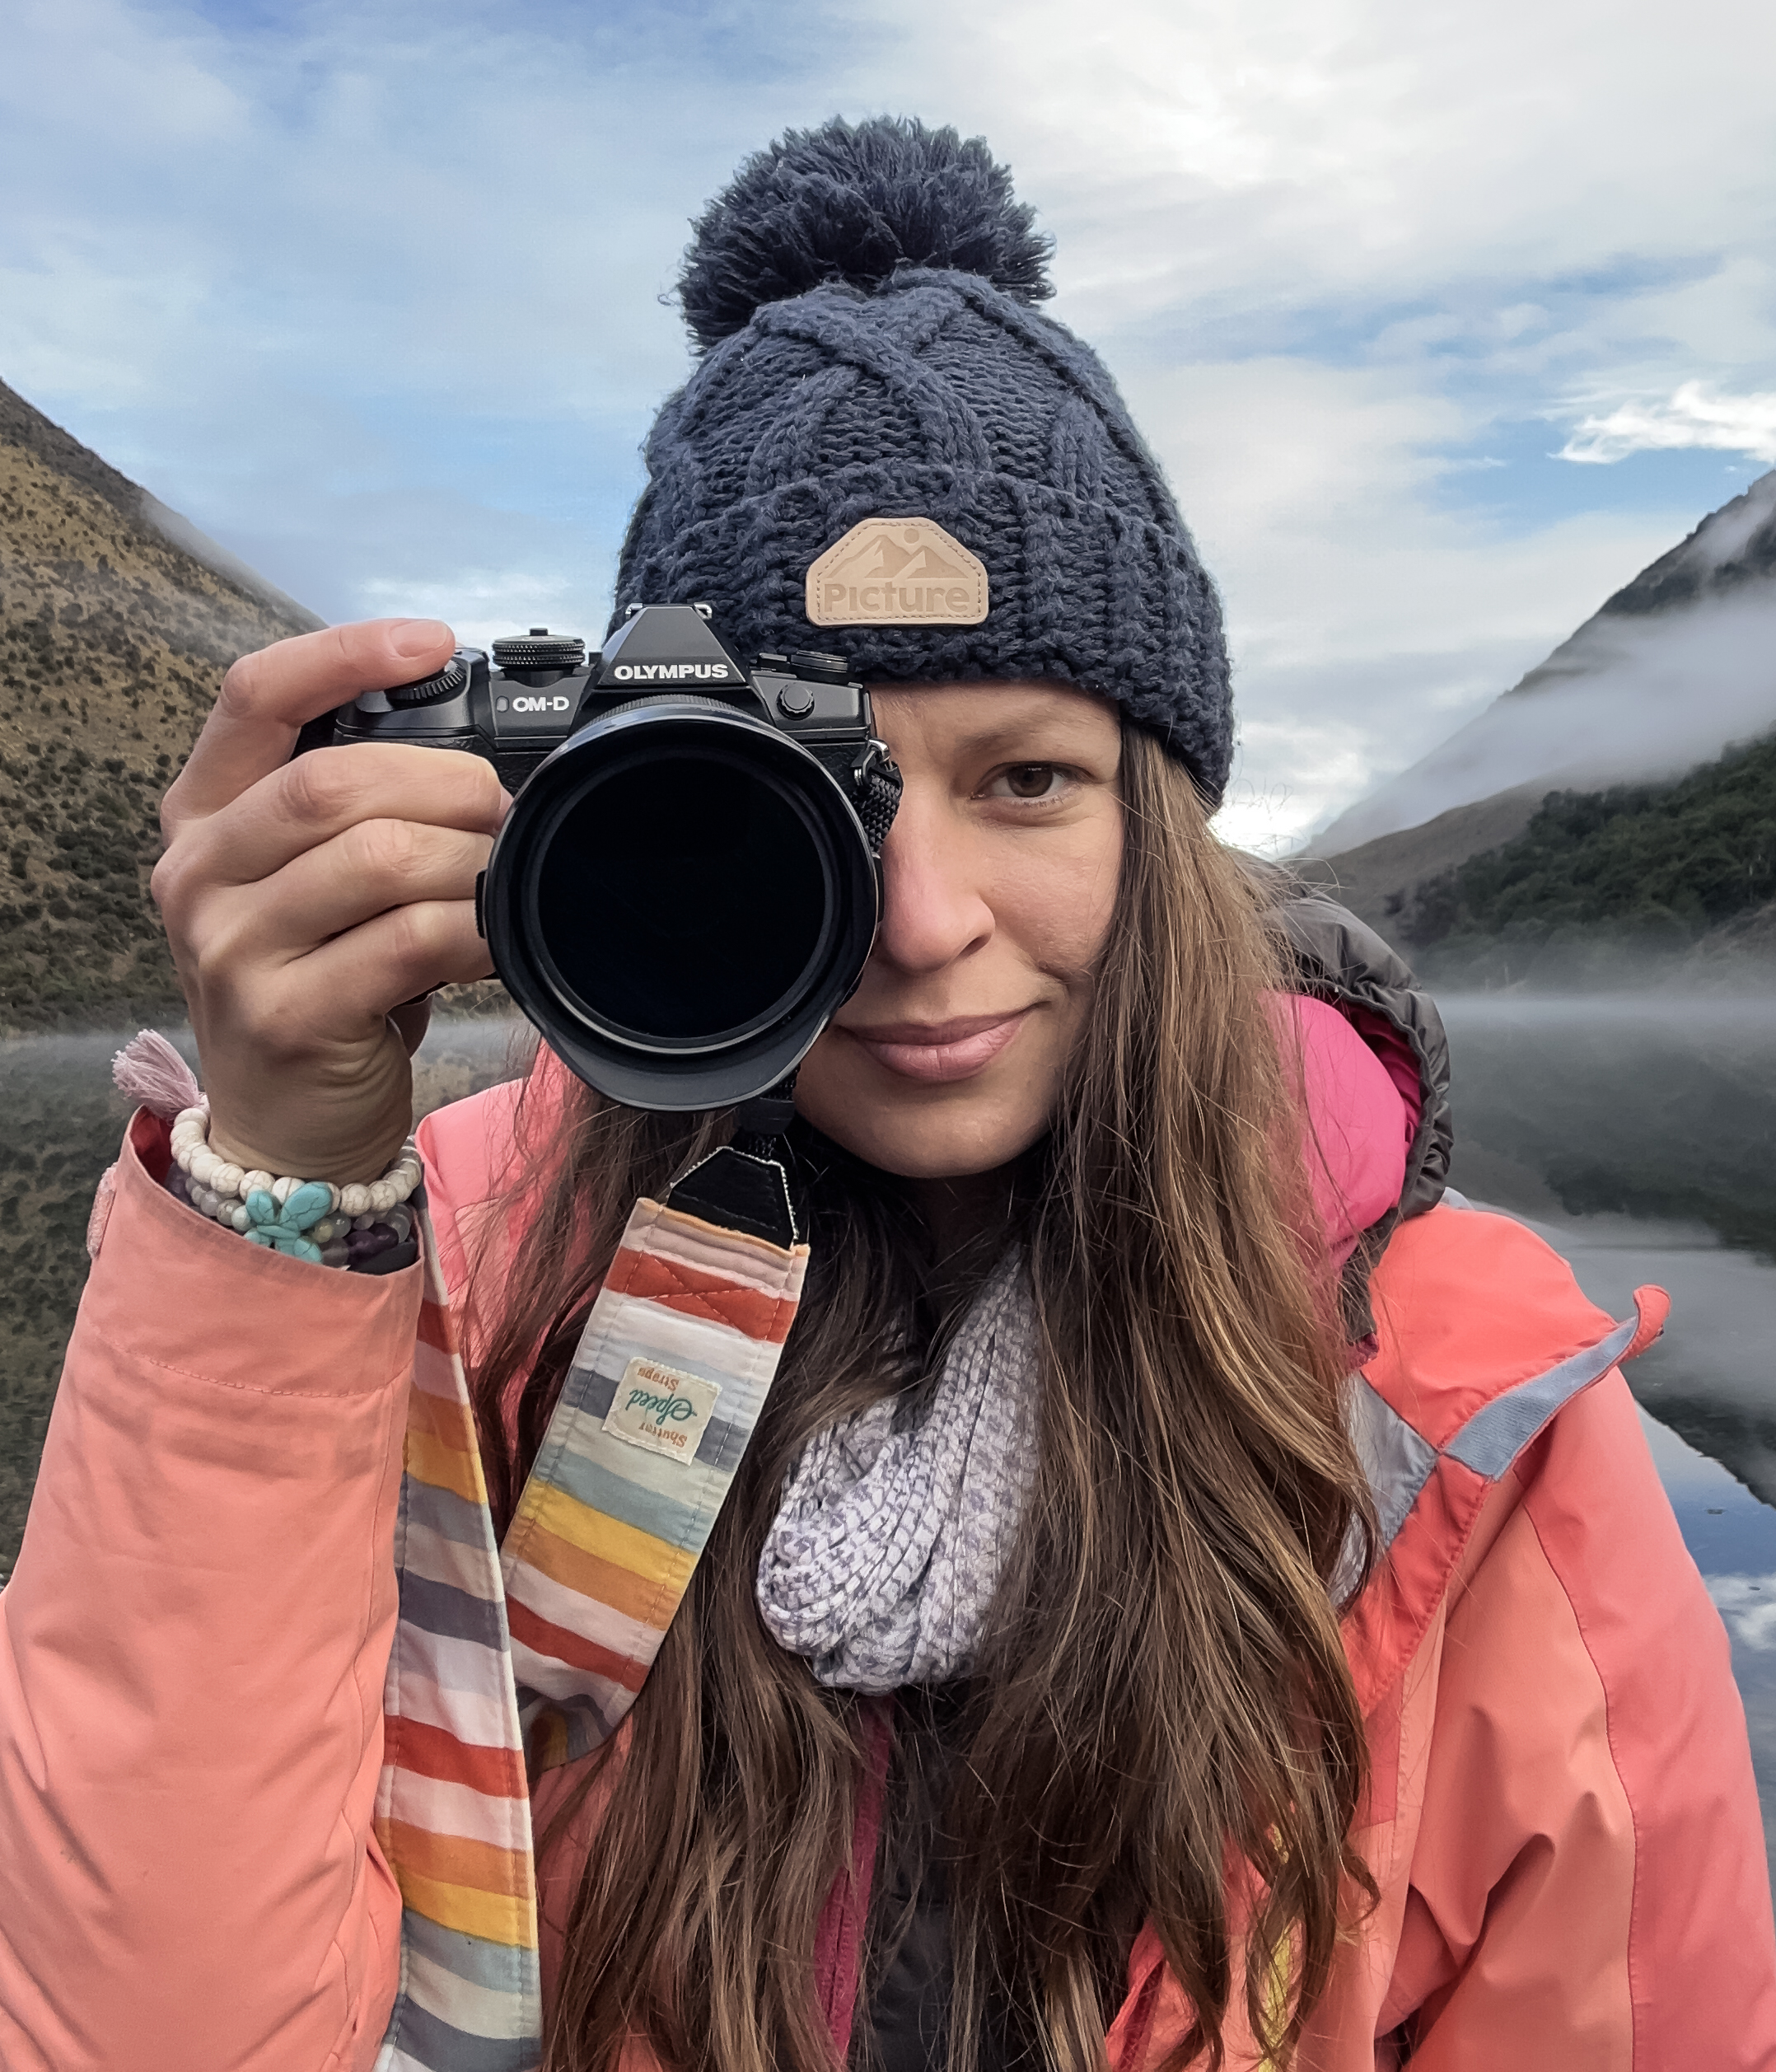
I’m Kat, an adventure and landscape photographer based in the South Island of New Zealand. My mission is to inspire and teach you—new and aspiring photographers with a passion for adventures, landscapes, nature, and travel. I’m here to help you transform your ordinary images into stunning ones you can be proud of. More about me